How to Import Files to Create a Custom Drop Down with IDs List
Custom drop downs with IDs are used when you already have a list of the Doctor / Specialist / Surgeon’s Names and ID on a spreadsheet. Using this method will save you time from typing all of the Doctor’s names one at a time. Here’s how to upload:
1. Login to http://www.preadmit.com.au/Hospital/<your hospital’s unique ID>
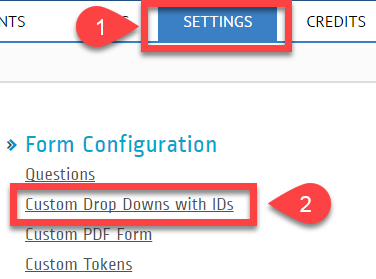
2. Click on Settings > Custom Drop Downs with IDs
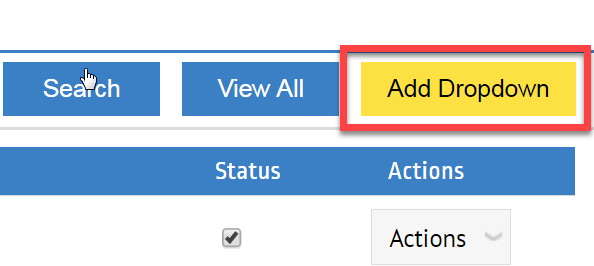
3. Click on the Add Dropdown yellow button on the upper right hand corner.
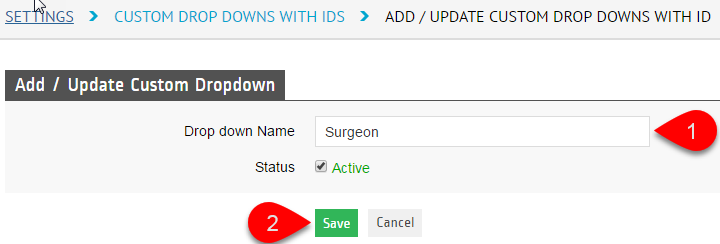
4. Then you’ll have to type in a Drop down Name then Save.
5. After you Saved the Drop down Name, another section at the bottom will show up. From this page, you will be able to add the Doctor’s Name and ID ONE AT A TIME using ADD FIELD button OR Upload an Excel file or Spreadsheet to have the Doctor’s Name and ID in a Drop down list ALL AT ONCE using the UPLOAD FILE button.
USING THE ADD FIELD BUTTON:
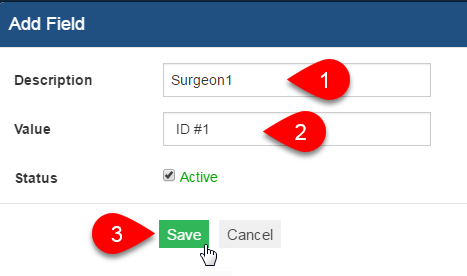
1. Type the Doctor’s name in the Description Field.
2. Value should have the Doctor’s ID (it could be the assigned ID number for each doctor in your Simday).
Status should be Active.
3. Click on Save once done and it should bring back to the Add / Update Custom Dropdown page.
USING THE UPLOAD FILE BUTTON:
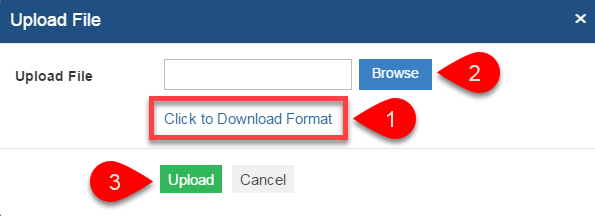
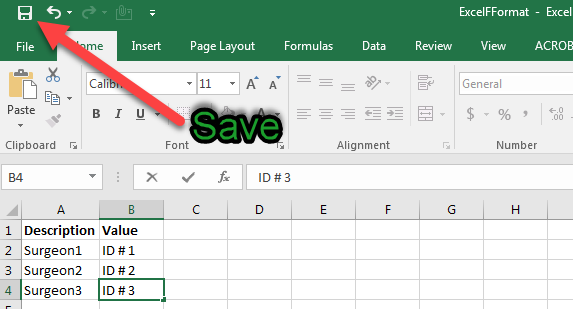
1. After you clicked on the Upload File button, the Upload File box will prompt and you can check on “Click to Download Format” and a blank Excel Sheet will open. You can export your Doctor’s List in this blank excel sheet OR fill in the Description and Value Fields manually (don’t forget to click on Enable Editing at the top of the page).
Once the list is ready, click Save.
2. Then you can go back to the Upload File window and then Browse for the Excel Sheet that you just saved then click Upload. The list should be showing on “Surgeons” Dropdown Name and its ready to be used as a dropdown option for your Questions in the Online Admission Form.
How to Use the Custom Dropdown with IDs
1. Go to Settings > Questions
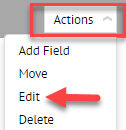
2. Look for the question where patients have to specify the answer from the list that you added. Then click on the Actions drop down and choose Edit so you can change it to drop down type.
3. In the Field Type, choose Drop Down: Custom with ID
4. In the Drop-Down Master Field, choose your preferred Drop down List
5. Click Save.
Here’s how it would look like on the Patient Portal:

